Monday, December 26, 2011

Packing It In

Three posts in three days!  Woot!  Gotta love those three day weekends. It's also fun to have things to show you guys that you haven't seen yet.  Wish it happened more often.  Here it is - the whole shooting match. All nine square-feet of real estate can be tucked safely into two 18-gallon plastic tubs.
See what I mean? Now that's a portable city.
Frankly, it's still too big for my tastes.  I'd love to hang on to this, but I really don't have the space to store two big tubs like that.  Not entirely sure what I'm going to do with them, yet, but I had a great time putting this all together.  Thanks for coming on the journey with me.

Sunday, December 25, 2011

Gamer's Eye View of the City

Merry Christmas!  My own little gift to you is a few shots of my completed cityscape.  Check this bad boy out.  Nine square feet of battleground ready for armies of little plastic warriors.  Of course, if you have more table to fill, and you have a ice gray drop cloth, you could put 4-inches of space between each city block and have a full 4-foot by 4-foot table.  How cool is that?

Pleasant parks, seedy industrial districts, this town has it all.

That big building looks massive centered like that.
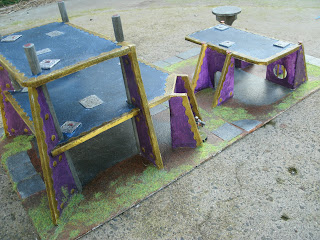
The great thing about this set-up is that I managed to avoid a table full of open site lines along the north-south and east-west directions.  Between the angles building supports and sewage plant, there are enough angles that you can't just plunk a heavy machine gun in the center and prevent your enemy from moving out of one corner of the city.

The unified paint scheme ties everything together well.  Here
you can see the ladders used for accessing levels.

I don't recommend playing on the patio.  I had to run
from the rain half-way through taking these photos.

A maze of sight-lines keeps things far more interesting.
You might be wondering how I can justify calling a big setup like this 'portable'.  Just wait until tomorrow...

Saturday, December 24, 2011

Four Square Feet of City

As a Christmas present to myself, I completed the holiday preparations early enough that I could devote a few hours to finish up the big cityscape.  So here they are, the last four blocks of the city-scape.

The round thing in  the back is some sort of modern concrete
sculpture/ nice place to snipe from.  There's a fountain  tucked away
behind the building right next to that concrete thingy.
Here's the detail of that fountain/sculpture.  You'll be able
to see how it fits  into the rest of the boards when I post
 a shot of the finished city.
Two of the biggest buildings in the city.  The one on the left
is the tallest, and the one on the right helps to break
up all the 90-degree angle sight-lines on the board.
Tune in tomorrow for shots of the whole nine-square-feet of city laid out in all its glory.  And Merry Christmas!

Tuesday, December 20, 2011

Home Stretch

Remember way back in October when I hoped to have this city table done by year's end?  I'm not quite done, and it's not quite the end of the year.


The paint streaks show up in these photos more than they do in real life.  They are also way too shiny.  On the other buildings, the dull cote and better lighting tones those down.  All that's left to be done is the dull cote.  That'll probably have to wait for Christmas Eve, though.  That needs to be done in the day light hours, and that means a Saturday job.

Monday, October 10, 2011

Big Project Blues

The problem with big projects like city scapes is that you do so many repetitions of the same work.  Take these shots, for instance:


Two more buildings base coated and ready for The Dip.  But we've seen this before, haven't we.  The only real new thing in this shot is the tablecloth, and nobody's coming to a wargame blog for a tablecloth show.  (Yes, yes, unless we're talking about a table cloth that makes a good terrain drop cloth.  Work with me here people.)

At this point this blog is more like a wargame version of those weight loss blogs:  Here look, I've lost another pound.  Whoop-de-doo.  Call me when you're ready for your close up for Mr. DeMille.  Well, I'm still four completed city blocks away from that.  Just bear with me and hopefully we'll get this bad boy knocked out and up on Ebay before the end of the year.

Thursday, September 22, 2011

The Promised Land: Work In Progress

Just as promised yesterday, I've got the first of a series of work in progress posts for all you faithful reader out there.  Most of the work here was accomplished over the weekend:


The brown portions of the ground here were primed, a little sand added, and then primed again to seal in the sand.  I used the same shade of brown as used on the other boards so that they'll blend in (almost) seamlessly.

It ain't pretty yet, but it's progress.

Wednesday, September 21, 2011

An Itch Not Fully Scratched

Wha-hey!  Guess who still has the gumption to slap some paint around?  That's right, it's your old pal, Warren.

Check it, peeps, the public utilities board is totes complete:


It's a little light on cover, but it's the heaviest board in the box. So it should be rugged enough to withstand plenty of play time.  The ground isn't nearly as shiny as it appears in that last shot.  The black windows were left that shiny on purpose, though.  I think it makes them look more like security camera covers.

Now I've just got to sand, prime, paint, seal, and dullcote four more boards.  Brace yourself for a few work-in-progress posts.

Friday, September 16, 2011

Obligatory Still Kicking Post

If you must, feel free to insert a cliched "not dead yet" joke here. (That's what most bloggers do when they return after an extended absence.)   Instead of that, I'm just going to stick with a meta-not-dead-yet joke instead.
At any rate...here are a couple of shots of the freshly painted pumphouse block.  It needs a coat of black wash to dull it out - it's too bright compared to the rest of the buildings, but a shot of The Dip will fix it up just fine.

It might seem silly to prime those blue plastic electric boxes in preparation for painting them a slightly different shade of blue, but this shade matches the blue in the rest of the buildings on the table.  This helps the overall visual appeal of the neighborhood and helps tie everything together.

I considered painting the buildings a nice industrial green, but that wouldn't work well with the green sludge pond.  I could have gone with blue water in the sludge pond, but The Dip would have made it look too muddy for my taste.  So here we are - blue buildings and green sludge make the pump house a less dull boy.

Tuesday, July 5, 2011

Mini's Eye View Redux

Happy Independence Day!

Here's a couple of quick shots of the new public utilities board from the tabletop:


Sunday, July 3, 2011

New Board

Two posts in one week?  I'm just the eager little beaver.  Good wife willing and the creek don't rise, I may get a chunk more done this three day weekend.

Part of my seedy underbelly board got reclaimed by my daughter this past week.  That forced me to add in more little details.  A few lumber piles, some soil to delineate the sump pond, and now we've got a lot more interest on this board.


The two maintenance shacks are blue electrical boxes with cereal box details.  Standard copper pipe and PVC elbows serve as giant conduits, and the lumber is just balsa wood cut to size.

Friday, July 1, 2011

Mini's Eye View

Couple of quick shots of what my little mans are going to be seeing when they fight over these nine square feet of battlefield.


Sunday, June 26, 2011

Big City Update

Dirtied up the city blocks this week with a coat of The Dip.  You can see that it took some experimenting.  The roof on the building in the lower left is a little dark for my tastes, but it does help to break up the buildings a little more.

This shot was taken moments after the application of static grass.  When it dries, it should be less splotchy. Otherwise, this seems to be coming along smoothly, if not quickly.


Here's a miniature's eye view of things.  I shopped out my kitchen and added a bit of lovely scenery for the little mans to fight over.

You can see how glossy that Dip makes the terrain.  There's very little color difference between the sidewalks and dirt now, but the grass helps.  Looks like this terrain will require some dullcote after all.

Monday, June 20, 2011

Painting the Town

You probably noticed that this has become a weekly blog.  I burned through my backlog pretty quick.  At this point, I'll just plug away at the new work during the week and throw up odd thoughts when I get the chance.  Sunday night is the best night for posting, but don't be surprised if I toss in the odd mid-week update here and there.

Enough about me, onto the terrain...

In a bit of a departure from my usual (paint everything in one color first) modus operandi, I'm painting the Big Town a few pieces at a time.  The actual color scheme shown here consists of blue floors with purple walls and gold highlights.  This color scheme should be somewhat familiar to you Halo fans.  Frankly, I didn't think this would work as well as it is, but I let my son pick the colors, and he was pretty adamant about them.  This is a work in progress, and it should look a lot better once I get some steel and shading in there.

Let's start with the park in the lower left hand corner of the above shot.  Using green scrubber pads for hedges is an old grognard trick.  To really make them look sharp, I've drybrushed them with green and yellow paint.  To keep their shape, I drilled holes through the craft board and hot glued short lengths of dowel for posts.  In the shot to the right you can see that I also folded them in half.  This gives them more thickness and a nice round curve to the top, and it also makes them more stable and less crushable in the storage box.


The texture on the ground surface was made by applying a coat of paint, tossing on a bit of sand, and then a few more coats of paint.  Brown drybrushed with gold brings out the texture and make it look dirtish.  Eventually, I'll apply green flocking for grass, but that has to wait until the painting is complete.

The sidewalks are sort of modular.  In this shot you can see how they almost line up.  Sometimes you get weird artifacts where one block of sidewalk sits alone in a corner, but for the most part, they help tie each the individual tiles together into a unit.

The fountain was made from a 1.5" PVC cap glued into a plastic flower pot base.  It needs blue paint and fake water yet, and I'm thinking about painting a miniature gray and sticking it on there as a statue.  That might make it tough to store that tile, though, so I haven't decided.

Sunday, June 12, 2011

Big Time Terrain

One of the things that I'm trying to do with my wargaming is keep everything compact.  This post details one of the reasons for that.

When I jumped back into the hobby, I really didn't look very hard.  I just bought up a couple sheets of foamcore and a handful of 12" by 12" MDF boards and started slapping together an urban scaffolding network.  The last big project that I worked on before the hiatus was a Necromunda tabletop, and I thought it would be nice to make a modular cityscape.

No big surprises here.  So far I've got nine boards with buildings up to three stories tall.  The sidewalks are cereal box, the hedges green kitchen scrubbers, and the pump station in the back is two light switch boxes with bits of piping glued to them.

The terrain is nice, but I just don't room for it all.  Even boxed up, it takes up way more storage space than I like.

Which leaves me with the classic dilemma.  Do I bail now, or see it through to the end, knowing that I'll have to part ways with it moments after giving birth?

No decision need be made for a few weeks, so for now I'll just keep plugging away at it.  Worst case scenario, I can sell it to make enough money to fund my next small box project.

Sunday, June 5, 2011

Sneak Peek

One Box Car Wars is essentially complete.  All that's left to do now is play the game.  There's always the temptation to go back and add just one more thing, or to tinker with it just a little more, so don't be surprised to see a few more autoduel posts.

In the meantime, here's a glimpse into my next project - Big Dang Spaceships.  Here are the raw materials collected so far:
Years back I spent way too much money on dowels and raw materials to build a matched pair of fleets with ships so big you had to play the game in the yard.  Never got to play it, though.  This time around, I've been collecting cast offs from the house, and figured out a way to stiffen up the empty bottles and mount them on low cost poles.  Since I live in Hawaii, I can use the beach as a tabletop and just spear the suckers into the sand.  Stay tuned for more details.

Saturday, June 4, 2011

Kid's Stuff

Time to start introducing this little hobby to the boy.  A few weeks ago, he got a box of Warhammer 40K figs to practice on, but I can't let him have all the fun.  Tonight, we glued them together in whatever way seemed cool.  Here are our results, sans paint.

Warhammer players will recognize these as Imperial Guardsmen - Cadians, I think. They will also recognize that WYSIWYG-wise, they aren't a 40K legal squad.  That's okay, because they won't be used for 40K.  Worst case scenario, we'll run a few games of Necromunda with them. Best case scenario, they each have enough personality to work in a game of Frag.


But they boy and I swung by the local game shop last Monday to scout out the tables, and what I saw disappointed me.  Out of 14 Warhammer 40K players, not a single one played with a fully painted army.  I'm not really a painting snob.  I don't have a problem with people who aren't the best painters in the world.  But I don't play unpainted.


Okay, so maybe I am a snob.  But if I'm going to go to spend all this money, and go to all this trouble to build and paint an army that looks good, I don't want to have to play against random silver hunks of metal.

So we'll stick with our own little mini games for now.

Tuesday, May 31, 2011

Smoke 'Em if You Got 'Em

More dropped weapons today.  This time it's the smokescreens first previewed here.  First up, a distant shot to show what they look like from a distance, and then a close up view of the texture.

As always, click images for more details.

These are scraps of soft, but stiff, packing foam used to cushion computer accessories.  I simply shaved them into the desired shape, hot glued them onto the appropriately sized counters, and then drybrushed the tops with  black paint.  My little cotton ball experiment failed in that cotton balls are too soft and fibrous - they start to peel away from the base before you even get them on the table.  These puffy nuisances hold their shape much better than cotton, and they don't blow around in gentle breezes.  

On the down side, they take up the most space of all the accessories in the One Box To Rule Them All.  So that means any additional cars I squeeze into the box won't have smokescreens or discharges.

Next Up:  Game On!

Monday, May 30, 2011

Up For Use

If anyone out there in internet land wants to use a few of my billboard designs...here you go.  I can't imagine anyone really wants to use the Hawaii or Kailua one, but heck, Uncle Albert is a classic, and who couldn't use Gold Cross?  All I ask in return is a shout out or link back to this here blog. Click on each one for a hi-res (600x300) copy.


Next Up: In the Boys' Room


Sunday, May 29, 2011

The Box Within A Box

Not a lot of time today, so here's a quick shot of my space saving solution.  In order to keep it all in one box, I tuck my pedestrians into the bunker.  Appropriately enough, the safest place for them in transit is also the safest place for them in the arena.  The extra space gets filled with smoke screens/more foam to keep the little mans from rattling around.

Next Up:  Some High Quality Stuff

Saturday, May 28, 2011

Ready to Paint the Arena Red

Here they are, the ten pedestrians ready to bail out of their cars and run for safety.  These were painted in a rush - 1 hour total for the lot of them.  I used The Dip method of painting, so they look a lot more grubby than I had hoped.  Live and learn.

 First a big group shot.

Some of my favorite little details.  My local arena is on the outskirts of Honolulu, so it only makes sense for somebody to sport a Hawaiian Flag.  The guy on the right is obviously sponsored by Coke.  You know that if any corporation can survive the apocalypse, it'll be them.

Another detail shot.  The guy on the right is the one that looks most like a terrorist, but I love the fact that he's sprinting and not just standing there like the world's most badass target.  Rambo in the center there is just asking for a few rounds in his chest.

Next Up: The Safest Place

Thursday, May 26, 2011

More Shameless Commerce

Keeping with the local Hawaii flavor, 808 Armor is Hawaii's largest independent armor importer and installation service provider.  They also sponsor the weekly amateur night.  But their community support doesn't end with the Hawaii Autoduel scene. They also founded and run the Adopt a Mutant Foundation.  Remember, folks, for just the cost of one cup of coffee a day, you can provide enough irradiated fauxmeat and saltwater to feed a mutant child for a week.

Gold Cross needs no introduction.
When your six year old daughter spots you painting up your little mans and asks, "Ooooh, can I make one?"  This is the result.  "Lenore's Manatee Store" - pets, feed, aquarium supplies, you name it.  For all your manatee needs, think Lenore's Manatee Store.  It's also my favorite ad in the entire arena.


Next Up:  All Dressed Up