Showing posts with label whoops. Show all posts

Monday, March 8, 2021

In The Shadow of Giants

Banged out a quick weekend project recently, with mixed results.  These towering trees look okay, but the roots are nil, and they are way too fragile for regular use.
Classic construction method consisting of paper towel cardboard tubes covered with tissue, and the tissue is held in place with watered down craft glue. The problem is that even with the glue dried they're very lightweight they need a much heavier base probably a cap of something harder than just tissue paper over the top.

 I'll get some use out of them but it's hard to see how many games. Which is fine I don't have enough storage for these things anyway.

Thursday, February 25, 2021

The Very Model of A Modern Wargame General

 The modern table continues to take shape.

A bit of screen, a bit of scrap wood, and a bit of sand...

And you've got some nice tall fences.
I'm not crazy about these fences.  I should have oriented the screen diagonally to make a diamond pattern, and the cloth style screening is pretty flimsy.  If you make these, go with the wire screen for better rigidity and robustness during storage.  Also, I cut the popsicle sticks in half thinking to save space, and now they aren't as stable as they could be.

You can see the half-sticks better here:

The brown lumps will automagically turn into a lumber pile and a stack of 8-inch diameter PVC pipes once they have a little paint on them.


Also added two lengths of rough board fencing to the table.  That's a pretty good start.


Sunday, October 1, 2017

Completed Housing Development

My big box of fantasy grows ever larger.  Because of the recent additions, I found it expedient to streamline all of my terrain boxes.  The collection now includes one box of general ground terrain (drop cloth, woods, roads, streams, etc.), one box of sci-fi specific terrain (billboards, buildings, urban scatter), and one box of fantasy terrain (wizard's tower, stone circle, the houses below).  With so little room to spare it makes no sense to duplicate effort on universal items.

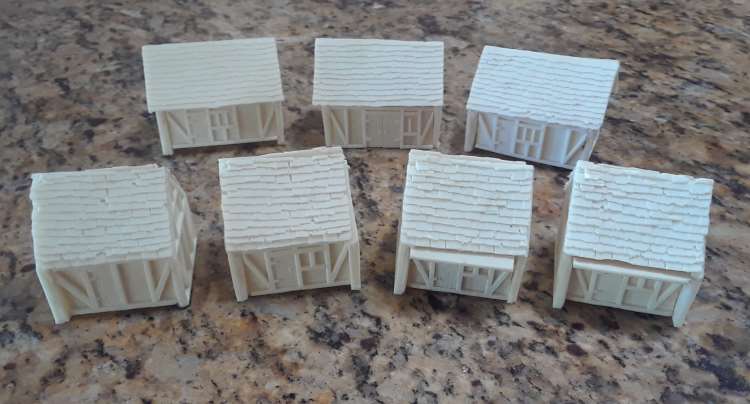
Two big houses and a barn.

The four small homes
These are all from the same manufacturer, Total System Scenics QRF Line.  Specifically from the Renaissance Scenics line.

At just four quid each for the smaller houses and six for the larger ones, they certainly are affordable, but the castings aren't the best quality.  These come in six flat pieces that have to be glued together, and the the thicknesses of the pieces doesn't quite line up correctly, particularly for the roof pieces.  Those I had to trim down by hand to get the right angle.  The peak of the house meet at 90-degrees, but the casts don't account for that, so you need to sand those edges down to 45-degrees to get them to line up right.  Without the right tools, I did what I could, but there was still a considerable gap along the peak of the roofs because I don't have a miter in this size and stink at filling in gaps.

Getting these put together took a lot more spackle and effort that I'd have liked, but if you have the time and are better with the zap-a-gap than me, you could do a lot worse than these buildings.

Here's an example of the sizing issue.  The left wall shown here extends beyond the roof line, and there was no way to fix this without making the right hand wall look worse.  This whole building leans to one side, so we'll call it the slum house if anyone notices.

I also picked up a few lengths of dirt roads made out of that latex rubber from these guys.  The roads came painted already and look great.  Those I can use right out of the box.

One of the things that I did to cover the gaps was use judicious placement of bushes.  The tall one to the left of the door shown here covers an issue with the wall and floor being mismatched sizes.

Oh, and check out that massive lintel over the front of this house.  Two of the four small houses came with fronts like this, and they don't line up with the roof.  If used as-is, that is to say placed such that the lintel can't be seen and allows the roof to overhang, then the sidewalls are too long.   I think they are meant to be used with the tall (two-story) houses and got mixed in with my order.  It's not that big of a deal - I just split the difference a little bit, and with the right tools you could just carve that lintel off - but it's one more thing that might seriously harsh a more serious wargamer's mellow.

In the end, considering the price and final look, I'm not broken up about this purchase.  They took a little more effort, but will really look sharp on the table.

Friday, September 15, 2017

Housing Development

I don't know about this.


In an effort to save some money, I bought resin houses for my fantasy villages that came in six flat pieces.  The guilty manufacturer shall not be named - they are likely a hobby outfit doing this in their spare time, so you'll have to look elsewhere for bad press.  (Unpainted lead mountains, like blood, are thicker than watered down paint pots.)

My assembly results were not so hot.  It took a lot of filing and shaving to get these things to look even halfway decent.  The glue didn't hold pieces together long enough to keep one corner straight while setting the other one.  Right now, the results look pretty haphazard, and not all of that is my fault.  Look at those houses int he front right.  They have some sort of overhanging eaves, but no matching sidewalls.  I split the difference, but it still doesn't look right to me.

A decent base and a stellar paint job might cover up for a host of sins, but I just don't know about this project.  I may have to chuck these in the circular file and start over before all is said and done.

Saturday, July 30, 2016

Sneak Peak Header

My banner was old and tired, so I spruced it up with a couple of new fantasy figures, the better to reflect my ongoing Castle Meatgrinder project.  Probably should have waited until Miniature Monday and after that lovely figure was posted, but...uh, marketing?  Spam post?  Actually, I just forgot that I've been saving figures for Mondays.  Come back in a day or so, you'll learn what figure that is and see some of her friends form the same Bones pack.

Saturday, March 26, 2016

Spear Trap

Another quickie for your lookie.  A wall of spears that leap out at adventurers who don't exercise enough caution.
 

This dungeon feature looks a bit rickety on its own, but it was built to fit over the "walls" of the 2.5D dungeon, like so.

You may have noticed that my scale figure swapped out weapons - his spear for an axe.  The last one was inadvertently basecoated black along with these traps.  Whoops.  Gotta remember to leave your scale figure on the desk when you hit the spray stand, people.  Rookie mistake.

Saturday, March 12, 2016

Overlooking Features

The only thing worse than adversaries attacking you from elevation is when you can't immediately access that elevation yourself.  The half-a-level rooms of my dungeon were designed to allow for one room to overlook the room below.  Open doorways dropping ten feet to the room below are against fantasy-OSHA regulations, though, so I built some fall protection in the form of a nice protruding balcony.

 You like the additional architectural touch of raising the balcony up a bit by adding a flight of access steps?  Purely unintentional.  When I first built the thing, I measured from the tabletop to the floor, forgetting that this balcony would be resting on the floor of the room below - a full 5mm above the tabletop. Rather than cutting the supports, which would have meant the balcony was just 5mm above the floor, I added the steps to give it a little more vertical difference.

The difference in thickness of the rooms is only 5mm, so that extra 5mm still leaves the balcony only 10mm above floor height.  About shoulder height compared to the standard miniature.  Just as the scaling of the furniture and the whole dungeon is a little off, I figure the vertical scaling is off by a factor of two as well.  That balcony should be considered 10 feet off the ground.  In true scale that would be two to three inches.  Highly impractical given the limitations of the one box.

The railing height is pretty good though.  Should meet fantasy-OSHA standards of 39 to 42 inches above the ground surface.  (Guess who wears the safety hat as part of his day job.)

Tuesday, January 26, 2016

The Learning Process

This new fantasy terrain is proving to be more difficult than expected.  My goal is to put something together along the lines of the The DMs Craft, but it ain't as easy as it looks.  For one thing, he works in the big 28 scale, where my stuff is built in God's Own 15mm scale.  So everything is that much more fiddly.  For another thing, I have a much higher bar for acceptable quality than he does.  That's not to say that his stuff looks bad, just that my initial fumblings don't reach his level, and thus won't reach my table.

Here, take a look at my first attempts at a simple pair of openable doors.  Heavy cardstock just doesn't have enough heft to support swinging doors, and frays much to easily.

They are too big.  That might work given that my dungeons are mythic underworlds where the normal rules don't apply, but the tattered ends of the strips, and the fact they tip over when opened?  That just won't cut it on my table.  So these shoddy doors went right into the circular file.

Likewise, with the tiles themselves.  The picture (shown a few weeks back) gives an idea of how rough my attempt at cheap construction looks:
The towers aren't round, the flat edges don't line up, and you can't see it, but the corrugation shows through the cardboard even before painting.  That's only going to get worse.

Unacceptable.  Castle, meet the circular file.

That's okay, a night spent learning what doesn't work has some value.  This time out, for example, I learned not to craft tiny little features a few hours after grouting a tile wall.  My fingertips are calloused and throbbing, not ideal for fiddly work.  Rome wasn't built in a day, and we've got all year to figure this thing out.

Wednesday, January 6, 2016

Small Box Blues, Part Three

Last time we looked at a few ways that smart people approach the challenge of cramming as much terrain into a small space as possible.  This time let's look at how a dumb person does it.  And by dumb person, I mean me.

In addition to cramming as much terrain as possible into a single small box, I also wanted to incorporate something that all of the last post's featured bloggers did not - the third dimension.  I want some height.  Both for visual appeal and for added gaming possibilities.  I want snipers and ladders, and ways to go over terrain and not just around it.


 My first attempt consisted of constructing two L-shaped buildings three floors in height.  These could be packed in to the big box side by side giving me two large end-pieces for a gray drop cloth.  Add some stairs, and a bunch of shopping kiosks, and you've got a nice little starport.

You put one of these in each corner, or even adjacent to each other, and  now you're talking.  The downside to this plan is that my fat fingers can't fumble back into the back corner.  With only six inches of head space, each floor is only two inches high.  You can get away with narrow corridors, but a full balcony just won't work well in practice.

Also, I mis-measured my pieces, and couldn't fit them both in the box at the same time.
At least I checked before going too far down this
dead end.
Cut that down by a couple of inches to make them square?  Bah!  Too much work for too little reward.  Besides, they would fill the box.  By the time the stairs and a couple kiosks are done, all I'd be left with is some small scatter terrain.

Next, I experimented with large one-story tiles, to see if there was a way to pack eight tiles with walls into the box.  There was a way to nest them resulting in a battlefield the size of 8 sheets of paper, but everything wound up really short and crammed into the box in a way that was guaranteed to damage the terrain.  There was still no room left for any sort of scatter-terrain.

Perhaps it was time for something really different?  Next time we'll look at a more Escher-esque attempt at the small box...

Thursday, November 5, 2015

Sci Fi Bystanding Guys

Quick shot of some bystanders for 15mm sci-fi games.  First up, four dudes in space suits of one sort or another.  I think they are all from 15mm.co.uk.


From left to right:  ?, HOF57A, HOF86C, and HOF86C


Can't find that guy on the left anywhere on 15mm.co.uk's website, so now I'm thinking he might be a Khurasan figure held over from a previous pack?  That doesn't sound right.

This is some sort of wandering alien holy man.  This sculpt looked alien enough that a simple flesh color would suffice - no need for exotic colors like green or orange or lavender. 


After finishing up the painting, priming, dullcoating, and finally photographing this figure, my son pointed out that when you see it on the tabletop...it looks like a giant erect phallus.  Good call, Warren.  Good call.

Friday, April 24, 2015

Linear Bust

Finally got around to pulling the caulk based streams and rivers out of the box where they have languished the last few months.

They tore.


Big time.

Not quite sure what went wrong.  Either the caulk was too thin, or you're not supposed to try to separate the caulk from the wax paper, or your're not supposed to use wax paper, or you have to pull them before you spray paint them with a base coat, or any number of other possibilities.  At least the bridge was salvageable.

Back to the drawing board.  Maybe just stick with the bass board basing that has worked well in the past.  Those streams and rivers wind up being pretty tall, but there should be a way to work them into the overall visual design of this terrain.  Stay tuned.

Saturday, August 23, 2014

Fields For Battle

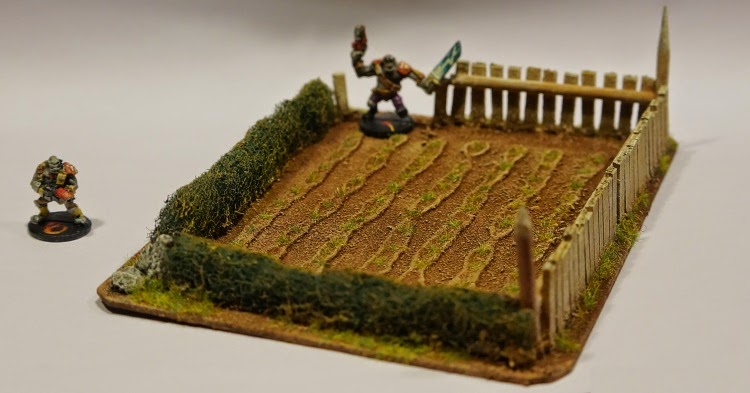
Yep.  So.  Got some paint on the farm fields.  Just need some dull coat to take the shine down a notch.  These fields give me three easily stored square-ish terrain blocks that will do a fine job blocking line of sight and travel times for ground pounders.

This one has static grass sprouts in the rows, but they
don't photograph well.

They look just fine, but a word of warning on a product that doesn't work very well for these applications.  Normally, I use a watered down craft glue to fix the sand covering in place.  This time around, instead of craft-style white glue, I grabbed a product called "Mod Podge".  My daughters use it for their Littlest Pet Shop trinkets, and it looked like it wouldn't require watering down.  Skipping a step made it look like it was worth a shot.
Like an idiot, I didn't read the not-so-fine-print.  Turns out that this stuff is high gloss (though you can buy a matte finish version).  Regardless, this stuff dries too fast for my tastes, and doesn't take to the acrylic paints well at all.  It took several coats of paint to cover the shine, which completely negated the time saved by not having to water it down.  Lesson learned.

Friday, July 19, 2013

First Ever Milliput Conversions

Well now, here's a thing.  Two part epoxy putty for conversions.  Let's start with something small and easy - adding helmets to armored orcs from 15mm.co.uk's Space Viking line.  How hard can it be?  I've worked with small details.  I've spent hours working with clay.  I've even read two whole tutorials on this.  It'll be a breeze.  It'll be a snap.  It'll be...
Lumpy
Cue the foghorn "wah wah" sound effect.  Oh what price hubris.  These helmets are okay and suitably orcy, but man are they lumpy.  This can be fixed with a few coats of paint to smooth them out, right?
Halfway there
Oh, also, the only milliput the local friendly gaming shop had was some sort of terracotta, so I'm using "red dirt stuff" instead of green stuff.

Let's just close out with a comparison shot to make this post worth something.  These armored boys tower over the dwarves, and are hefty compared to humans, so this should work out okay in the long run.
Size comparison


Monday, March 11, 2013

Bio Ships with Paint

Continuing on with the bio-ship construction, we've got paint on the field - paint which illustrates why you have to let these ships dry before you paint them - especially if you stick extra doo-dads into the foam.

Whoops.
Painted too soon.  Didn't put foam on top of the cupolas to hold them down.  Shame on me.  We can fix this - we have the technology, but man, what a hassle.

Snot fighters!
Yeah, so the paint job here is meant to evoke plants, right?  So, I painted these brown first, and then held the can over the top and applied a layer of green.  You know, like trees?

Halfway through the process (as in, these only had the brown paint on them) my son came out to the yard and asked me why I was making a whole bunch of really giant turds.  Danged if he wasn't right about what they looked like.
I may have hurried to apply the green paint, just to keep the neighbors from wondering what the heck that crazy Warren was doing this time.

Monday, February 18, 2013

Foam Core Cruisers

Turns out those deodorant bottles are frigates, and we're moving on to assembling the cruisers and battleships.  At least that's the terminology for Full Thrust.

The first attempt at the bigger class ships didn't go so well.  The plan was to fill odd shaped shampoo bottles with Great Stuff foam, wait for that to harden to give the bottles more internal stability, and start slapping on bits from there.  After 24-hours, the foam inside the bottles were no closer to hardening than they were after one hour.  So those got put into the circular file, and Plan B put into action.  

Plan B for this project is basically the same as Plan B for every wargame project of mine - foam core.  Lots and lots of foamcore.  A big sheet of foamcore provided enough material for the skeletons of three cruisers and one fleet carrier.  Here's an example of the skeleton side by side with a detailed ship ready for painting.


We're looking at all sorts of bits and bobs there.  The most recognizable are the Schick disposable razor handles, bamboo skewers, the top of a 25-cent ball for a dome, and a toothpaste tube cap for the thruster.  It'll look way better painted up.

Friday, December 28, 2012

Are We Learning Yet?

This blog was supposed to keep me grounded.  It's called War In A Box for a reason - that's supposed to remind me that I've got no space and that every game needs to fit into a tidy little box.  The spaceship I've been working on is super-kewl, but it is a clear violation of my own ground rules.  In an effort to get back to basics, I picked up a small tub for the express purpose of designing a Pocketmunda set-up - a full table of 15mm terrain (by which I mean a 2-foot by 2-foot square of terrain - that would fit into a small and portable case.
One exactly like this.  Note figure for 15mm scale.
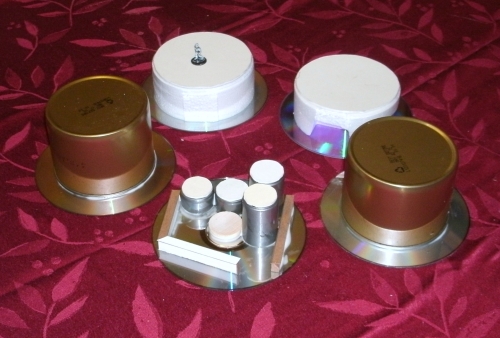
Bear in mind that work on the big ship continues.  With a bit of free time and a need for better lighting to work on additional furniture (which looks great, but will wait for the final paint job before posting), I bashed together a few buildings for Pocketmunda.
Old almond tins, Christmas styrofoam, and various bits and bobs.

The plan was to fit everything onto old CDs for ease of basing and storage.  For once, I stopped progress early to check on the fit.  The results were...
Less than stellar.
That's only four buildings so far.  You can't fit more CDs in a second row, and there's not going to be enough room for a drop cloth.  That's unacceptable.  Looks like I'll have to go with square buildings that nest inside each other in order to get enough buildings to satisfy that urban-decay look.

So that didn't work, but let's not lose sight of the important bit - this time, it didn't work after 30 minutes of work, instead of after 30 hours of work.  That saves me mor ethen 29 hours of labor, and it saves my face from another epic palm slap.

Wednesday, December 26, 2012

Merry After Christmas-Sale Day!

Happy Boxing Day!  In honor of whatever is those kooky Canucks celebrate today, let's all point at Warren and laugh at how he still hasn't learned his lesson.  Remember way back earlier in the year when I spent hours building roads for Car Wars and when they done it turned out they were the wrong scale?  Yeah...welcome to the second verse of that song.

We're gonna need a bigger box.
Whoops.  Finally checked the height of the starship against the tub that it was supposed to be stored in and it ain't even close.  Even if I take off the decorative spire, it still won't fit.  Le sigh.  Oh well, a bigger box will leave more room left over for a second ship, right?

Tuesday, December 11, 2012

Almost Awesome Storage Solution

Down to the local craft store this past weekend, looking for a small plastic box to house my Mangalorcs between games, and stumbled on this slick little number.  It's a carousel of five small boxes that detach, with a larger and deeper central  bin on top.  It's only nine bucks, and it can probably hold a good 100+ figures in the 15mm scale, with room up top for three or four vehicles.

Yoink!
 It's almost perfect.  Look at how cozy my li'l space bastard are in there...
Cozy is realtor speak for "really small".

There's just one problem...
Whoops.
It's about 2mm too short for any slightly oversized figure, or one waving his pistol and sword in the air.  Yeah, you could put those few figures in the upper bin, but then they wouldn't be together, and you wouldn't have a way to showcase your force in one place.  It totally defeats the whole purpose of the thing.

Back to the store with you!

Tuesday, December 4, 2012

Cheese it Boys, It's the Copse!

This looks like your normal wargame tree stand.  Art posterboard cut into a circle, a few dollar store plastic trees, some rocks, sand, and paint, and it's an instant forest.  In my world it becomes a low-cost oxygen generation machine.  This is designed to fit right into the heart of the spaceship, as seen in the third photo below.


Damn that looks good if I do say so myself.  The small stand of trees will be glued in place once the ship is painted.  Gluing it in place right now will just make it harder to paint the rest of the ship, so that is just going to have to wait.  Note that the whole spaceship has been primed at this point, a nice rich creamy almond color.  It took almost a full can of primer, but the whole she-bang is primed and ready for...more primer?

Yep.  The color is great, but the finish is gloss - the kind of gloss that won't hold the craft store paint on hand.  That means it needs a full coat of clear flat sealer before I can really start in on the painting.  Whoops. Ah well, one more coat won't hurt, and since this color really is perfect for the ship, it's well worth the extra step.