Tuesday, January 29, 2013

Pocket Battlefield

Calling this roughly 2-foot by 3-foot mat "pocket" stretches the definition, but it surely is portable.

Nothing really special here, just a heavy canvas bolt of cloth dusted with three different dark colors of spray paint.  Although, I'd be remiss if I didn't give a lot of credit to the lovely and talented Mrs. Abox for sewing up the edges of the battlefield to keep the canvas from fraying.  She did that after the spraypaint, too, at serious risk of gunking up her sewing machine.  Now that would have put a damper on future gaming for a few weeks, let me tell you what.

Oh, and the rivers and pond are made from a nice shiny satin cloth.  Unlike the mat itself, the waterways are best stored all wadded up and jammed into the box.  If you fold them neatly, they don't get those little ripples that make it look like shimmering water.

We've been using the water as slow going (half movement), which slows things up.  The board is going to need at least one ground level bridge, if not an accessible ford or two.

I'm also thinking about spray painting some permanent roadways on the mat, too.  Raised roads won't fit in the One Box To Hold It All, so maybe just put roads on one side of the mat to give another option?  At this point, I like being able to roll up the mat so the paint is all on the inside and not rubbing up against the buildings.  A second coat on the underside might smudge up the rest of the terrain.  Must cogitate further  - anybody have any advice on that score?

Monday, January 28, 2013

Most Boring Gang Yet

Rebel Mini's BioHazard Zombie Hunters are great sculpts with a lot of potential, and at $6.50 for a full 12-man gang, too hard a temptation to resist.  As it stands, this pack gives me a shooter force in body suits armed with only a couple of pistols (can you say "House Van Saar" boys and girls?  I knew you could).  No leaders or heavies, but that's okay - that's what Khurasan's Hazmat Suited figures are for.  Once I score those babies we're looking at less than twelve bucks for a full 17-man gang.


Man, it would have been nice to go crazy and paint those suits in multi-colored flames or something way outside the ordinary, but you never know what the future brings.  Boilerplate yellow leaves the door open for future modern day anti-zombie games.  The only nod to personality made is the colored hoods.  It may be boring, but it's functional, and sometimes that's worth the sacrifice.

Monday, January 21, 2013

Lock Up Your Sons

Meet the Electric Knights, my daughter's Not-romunda "gang".  She picked the colors, the font for the bases, and named them all.

While trimming the old leader's pistol down, things went south, and I had to make a new one.  So I pressed a Laserburn crew member with a law officer head into service.  Until I find a decent rifle to replace it, unlucky 13 there is unarmed and useless.
Leader on the left, heavy on the right.

Khurusan's Grave Monitor Crew.

Rebel Mini's MERCs.
As the campaign stand, the Knight's leader is being held captive by the Mangalorcs, and the heavy (#2, Boom-Boom Betty) has stepped up to lead until these lovely ladies can mount a rescue mission.

Sunday, January 20, 2013

Goldilocks and the Three Scales

A funny thing happened while teaching my kids how to play Necromunda in 15mm.  We played two different games, one in the big rocket using the standard movement and ranges in inches, and one in the urban terrain converting all measurements to centimeters.

We test drove this WIP terrain - not a fan of playing
on unfinished terrain, but sometimes you takes
what youse can gets.
Oddly enough, the inches worked fine in the rocket ship, and centimeters didn't work in the urban terrain.  Obviously, converting to centimeters essentially 'grows' your terrain, and the rocket is meant to be a small, confined space.  As it turns out, using centimeters wouldn't work in the rocket, because you'd spend two or three turns just crossing one room.  When you use inches, the confined space favors the pistol packers and the melee specialists at the expense of the long range shooters - as it should be.

On the other hand, we didn't much care for the use of centimeters in the wide open city.  It made the city feel  way too big.  It took too long to get anywhere, and moving your little doods a whopping 8-cm per turn running?  It didn't feel like you were accomplishing anything.  Instead, we scaled the game down by cutting the ranges and movement in half.  And that scale was juuuust right.

Turns out scaling down by 50% instead of 60% makes a big difference in the feel of the game.  Who knew? At any rate we're going to stick with halving all ranges...

Sort of.

There's one aspect of the game we're going to leave as-is - templates. 
Hand-painted and way cooler than the black
and whites in the rulebook.
Here's where things get interesting.  I honestly don't know how close to the RAW these templates get.  I just printed up the page from the rulebook onto a 5-inch by 7-inch card and used what the printer spit out.  These could be too big for our half-sized rules, and are certainly too small for our full-scale fights, but we don't care.  They are too big or too small for everyone, and that's how we balance things out.

Friday, January 18, 2013

Working on The Ladies

My 12 year old daughter decided she wanted in on a little bit of the Not-Romunda action, and after a bit of shopping she settled on an all girl force composed mainly of Rebel Miniatures Black Widow Mercs and Khurasan's Gunboat Marines with a sprinkling of Laserburn adventurers.  That keeps us well away from the bondage-slash-S&M look of Necromunda, which my daughter doesn't even know that she's not allowed to like.

The challenge is adding a little more personality to these figures.  The MERCS are all packing pistols and the Grav Monitor crew carry future-tech-rifles.  The good news is that these two packs give us a variety of rifle armed and pistol armed ladies, all of whom wear body suits.  The challenge is that this leaves us with 12 figures carrying 2 different kinds of weapson.  Bo-ring!
 
This looks like a job for conversions!  Not an easy task in 15mm, but not in surmountable.  In many ways, the smaller scale makes converting easier because it limits what you can achieve, it lowers expectations, and it lets you focus more on big picture stuff without all the fiddly details.  The figures are so small the big picture items are fiddly details.  So far I've just done simple head and weapon swaps, but those two alone give you a wealth of options.  Here are three of them:

That's a MERC with an axe cut from a 10mm Pendraken gnome adventurer. Once I trim the pistol down and round it off, it'll look less like an axe-gun and more like a proper power-axe.  [Editors note:  After one game, I tried to do just that, and it failed miserably.  The figure looked terrible so I had to start over with a new figure.  I'll post an update later.]

The gal on the left is a Laserburn heroine with the head of a Laserburn Law Officer.  Her pistol was trimmed off and the front replaced with the rifle and grenade launcher donated by one of GZG's new Tomorrow's War figures.  That's two figures from five lines of figures from four different companies - now that's what I call bashing some kits.

These two figures started out as identical twins. Ms. Lefty had her arm bent back and a small piece of plastic trimmed down to a vague sword shape attached.  To add even more variety, I twisted Ms. Righty's head a little to her left.  Ten minutes of work, and now I've got two unique figures.

Thursday, January 17, 2013

The Big One

That building is crazy big...

 But it has to be in order to hold the bridges safe and sound...

Both of them, for now...


Wednesday, January 16, 2013

Solutions Everywhere


Retro-future-cities should look something like this:
My buildings are too boxy for that.  A complete overhaul would blow the ability to pack it all into one tidy box right out of the aetherium.  What to do, what to do?  We're gonna need the right paint scheme and some baubles on those buildings to retro-fy them. There's a great example of the sort of styling that I'm looking for over at Lead Doesn't Bleed (take a look).  All those spires and pointy bits will prevent this terrain from packing into its box, but we can still mimic the overall aesthetic with the right baubles and paints.
 
We can also use architectural features like bridges to add flavor.

Like so.
That's a nice sweeping bridge with plenty of potential for some 1950's style sci-fi crystals or some such.  This bridge also includes a clever solution to the stability problem.  Here's a close-up:

Pegs and flats make a snug 90-degree fit against the tops of the buildings.  They also give more detail to paint and liven up the bridge.

That gentle arch is delicate, too.  You won't see a bright swoopy bridge like that in the Underhive, amirite?  There's only one problem:
I didn't check the bridge size to verify that it would fit in the cookie tin designed to protect it.  We're gonna need a bigger tin.  That's actually not a problem, though, because in retrospect that tin wastes a lot of room.  We can build a box that will hold the bridge, and one that will double as another building.  Woot!  Look at all these solutions, they're everywhere!

Next up, uhhh...I better get cracking.

Tuesday, January 15, 2013

Shoots and Ladders

Before we get to the ladders, we're going to let the suspense simmer for just a few more minutes to look at another little trick.  In addition to the ladders, this terrain has three staircases.  They are made from art matting board and use the "figure base sized stair treads" convention we wargamers have seen a dozen times before.  

So what's new here?  What's new is that your humble blogger took his head out of his butt long enough during construction to look ahead by 20 minutes.  Specifically, he made sure that the new stairs would be small enough that the small buildings would fit into the larger ones for storage, like so.
In your face, lack of foresight!
Not only that, but I paid attention to the ladders as well.  This stuff is modular, right?  And that means you want it to look good however you stack it, and that means no ladders that start in mid-air.  So I made sure that the ladders could line up in a lot of different ways, too, like this.

Or this.
And that last one is double slick because not only does the ladder goes all the way to the top, but the stairs don't drop off into space.  You can set these things up in a whole mess of different  ways.

Now if only I could figure out how to build bridges that fit on both types of rootops - with and without balconies.

Next up, bridges!

Monday, January 14, 2013

Strategery, Blog Style

Here's the thing.  I'm working on a new urban terrain board at the moment, and for the most part using standard construction and detailing techniques.  Rather than repeat what others have said numerous times, I'm just gonna chime in and point out new little wrinkles on the old stand bys.

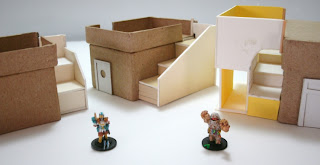
For example, here's a shot of the cereal box details that will make mache boxes from the craft store look like actual homes and buildings.  Nothing spectacular here, except for the black circles - those are the covers to ear-plug style headphones.  They should make decent vent covers.


Hey look, they are glued to the walls now.  What's new here is the use of stitch fabric (aka "granny grating") for ladders.  These look so much better than the zip ties used in the rocket, and were a lot easier to attach.  The position of those ladders is a whole blog post in itself (watch this space).

One thing that I'm struggling with here is how to make this terrain really unique.  The world has enough spiky-skulls-and-industrial-decay terrain, and we've all seen a number of different desert colonies or martian terrain.  These look boxy right now, and pretty typical.  I've been googling sci-fi pulp novel covers for a while, looking for a way to pulp these up.  I figure they'll be concrete or white with some bright colors and trim, but haven't decided on a final color scheme yet.

Here's some ground scatter cover counters with drums made from bits yanked out of an old electronic keyboard.  This isn't a new trick, so this is the sort of thing I'll avoid for cool stuff, like the ladders, coming tomorrow...

Next up, ladders... (surprise!)

Sunday, January 13, 2013

Monster? I hardly knew her!

Khurasan's tentacles star beasts are on the menu today.  Those arms look really wormy, so I painted them worm brown.  Instead of a green slime beast, I also went with a white hairy thing with brightly colored feathers.  Those feathers make it look like these guys are wearing bright skirts, though.  So if you ever pick these boys up to menace your own pulp heroes...stick with the classics.


On the other hand, the first thing my daughter said when she saw them was, "Oh, I like the feathers."  So I must be doing something right.

Next up, Pocketmunda terrain...

Saturday, January 12, 2013

Moving on...

The big rocket served us well, and will continue to do so in the days to come.  But it's been a project almost 4 months in the making, and I'm getting a little eager to move on to something more traditional.  S'okay, though, because it's done enough for government work, and it meets my criteria - I've played two games on it, so I'm free to move on.  Before I dive into the new stuff, though, here's a last look and the semi-final rocket in all of its 15mm glory:


Thanks for watching along, and all the encouragement and feedback.  It really helps keep me motivated.  Don't be surprised if we revisit the rocket later; I can see three blank rooms that need filling with bunks, hydroponics, and *mumble mumble* something spacey *mumble.  I'd also like to get some slick little one-seater canons to put on those small side pods.  Oh, and the bottom floor on that last picture would make a great shuttle bay, if I can find a suitable figure.  That hole in the middle floor need a railing, and...well, you get the idea.

Next up, more Pocketmunda terrain.

Thursday, January 10, 2013

Game On! Not-romunda

This past weekend I finally had everything in place to introduce my son to the glories of Necromunda by way of 15mm figures and the great big ISS Major Tom.  The process was fairly painless as the boy has a firm grounding in the basics of the GW game engine through 5e/6e Warhammer 40k.  Which meant that it only took five minutes to cover the 2e wrinkles and skirmish-specific rules for Necromunda.  

To complicate/simplify things one more step, I chucked the whole background and built two gang rosters, one for the mangalorcs and one for the crew of the ship.  Every figure started out WYSIWIG, which meant that the balancing rules requiring X number of gangers, and Y number of heavies went right out the window.  The mangalorcs have three heavies (2 big stubbers and a flamer), and a lot of juves.  Both sides also started with some exotic stuff like flak vests and power swords.  We didn't bother with gang ratings or territories, either.  We just talked through the narrative between the two games we played

Here, my heavy gets the drop on the mangalorcs and makes them pay a heavy price for sneaking on board my ship.  Although the mangalorcs won the game, I did manage to kill one of his heavies and capture another.
So we immediately played through a rescue scenario in which the boy made good use of the vents to get up close to the captive.  He managed to sneak up to the captive and bushwack two of my three guards at the same time.  Unfortunately for him, the now-freed captive ran straight into the mouth of my overwatching heavy who punched him full enough holes that you could use him as a colander.  The captive was freed, but did not live to enjoy his freedom for very long.

In the end, his mangalorcs put a beat down on my boys on the way out of the ship, but in the final analysis the experience favored my crew more than his raiders.  My experience and injury rolls were just what I needed, while he wound up with corpses and liabilities.  Again, we jettisoned the whole territory and gang rating section of the rules, which might balance things out fine for tournament play, but we're just goofing around, so it works for us.

Still and all, he is eager for more, and that's the best a wargaming father could ever ask for.

Wednesday, January 9, 2013

Medic!

The Big Ship already has a med-tank for fixing Wampa bites, but it needs a medical bunk for less invasive and critical care.  Hence, the med-scan bunk.  This doohickey was built from card stock and wood bits.


With paint it looks a lot more medicish:
Put it inside a sterile environment and it looks even better:


Tuesday, January 8, 2013

The Emperor Protects (painted figures more than unpainted ones)

My son received a few more Imperial Guardsmen from a friend this Christmas.  He knows that if he plays a game with them sans paint, that his old man will feel such overwhelming shame that he'll take the dang things and paint them for him.  He did it to me again when he took the new 40k rules for a test drive on New Year's Eve.  Within 10 hours, I had primer on these guys.


Again, that's his preferred paint scheme, and to be honest I just painted these up as fast as I could and still get table-top quality results.  This is hardly my best work, but it beats bare plastic, and it looks fine on the table.  The other consideration is that the boy will field upwards of fifty to sixty of these guys at a time.  For sheer spectacle, he takes the side of quantity over quality.

Anywho, six painted little mans for my little man - Merry Christmas, kiddo.

It took me about roughly 3 hours to paint the three of these guys, which is about half the time a quality job would take.  These guys are the other reason that progress slowed down over the break.  In 3 hours, you can paint a dozen 15mm figures and still have time left over to build some terrain.  Speaking of which, wait until you see the new medical bench that's just about ready for the big spaceship...

Monday, January 7, 2013

The Most Wonderful Time of The Year (Is Over)

Of course the title of today's post is referring to college football season (and the reason for my recent silence).  January 1 really needs to be rechristened as the Feast of Saint Football.  Congratulations to Alabama - it's nice to have a legitimate national champion again. Sad as it is to know that we are now eight months away from the next college football game, at least it frees up a little more time for wargaming.  Who knows, maybe I'll even be able to squeeze in a game or two before the next kickoff.

Two minor updates today:

I did add drums to the cargo bay.  Poking around the hardware store, I found small plastic spacers in the hardware aisle with the bolts and screws and whatnot.  They are the perfect size and shape for drums, they just needed a small hole-punch sized lid and a few painted on labels to complete the look.  
Drums added to the cargo bay add a little more
clutter and flavor to the room.
The kitchen is now furnished.  The paint job on those cabinets is pretty weak, but the table turned out okay.  That's a pretty hefty table without a lot of legroom, but it should stand up to the rigors of play.  The chairs might not do so well, though.  They are constructed of bits of cereal box cardboard glued to small wooden pegs.  You can buy those pegs at the hardware store for a couple of cents each - they are designed to plug the holes left by screws when you build furniture, but they are great little bits with all sorts of uses.  These are the same bits I used to build the pots for the plants.

A nice comfortable place to rest your head while the
chestburster alien-baby claws its way out of your belly.


Tuesday, January 1, 2013

The Cargo Bay

This cargo bay is off to a good start.  As it stands, it's kind of like a rock band - it's just not complete without any drums.  It looks a little sparse, but I don't want to take up too much valuable gaming real-estate, so once I block a few more firing lanes with drums and barrels, we'll call it a day.  As it stands, the crates give the impression of a crowded warehouse with twisty aisles, and that's enough for now.  

Couple of other points to consider.  This room features about the only dead-end in the entire ship down there in the lower right corner of the shot.  The tallest crates are nearest the vent, so that's probably where you've got to climb to get into that one and where you appear when you climb out.

The crates are made out of balsa wood and cardstock, painted up with stamps and labels.  The futuristic skids and pallets are obviously just hex-bases covered with cardstock and painted black.

By the way, Happy New Year if you're into that sort of thing.