Showing posts with label terrain. Show all posts

Friday, September 10, 2021

Clever Scenario Design

Wargaming videos make a fine soundtrack for painting sessions, and every once in a while you stumble across a bit of genius you can't wait to steal.  This wonderful battle report from House of Hengist Comics Wargaming Channel struck me as a novel sort of game, and one of those rare scenarios that I've never played.  It's a WWII fight, a little slice of Market Garden fought using Flames of War, but at it's core is a very different sort of scenario than the usual 'line 'em up and crash into each other'.  As ever, we can take the ball from Hengist and run with in a direction more suited to our own style and purpose.

The basic idea is a race for an objective as shown here.  Two forces running parallel to each other, both seeking to claim an objective at the far end of the table.  The center line of the table is broken by terrain that blocks movement and line of sight, with only one or two breaks to allow for that all-important tactical decision tree.  Here, we've got a Napoleonic skirmish that pits two equal sized forces, both entering the table from the west.

On this much simplified level, the major decision point arises from the question of whether to waste time and resources seizing the bridge and perhaps cutting the enemy's forces in half, or fully commit everything to grabbing the fields to the east.  The enclosed fields are rough terrain, and not well-suited for cavalry maneuvers, adding the complication that the units on each side that can get there first are not the best for holding onto that ground.

To complicate matters, and this might have been a wrinkle too many, I held one (random) unit in reserve on both sides of the fight.  That uncertainty adds additional weight to the choice of whether to drive across the bridge, given the increased probability of cutting the enemy's forces or at least delaying any reinforcements long enough to allow your other forces to dig-in for the delayed counter-attack.

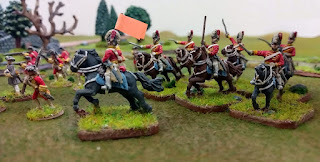
No spoilers. To find out how the fight went, you'll have to check out the channel later this month when the play-through video of this "Chosen Men" scenario goes live.  For now, you'll have to settle for some pretty shots of the fancy lads in their fighting gear.

Yeah, I used a post-it note to mark the British Major. Some day I'll have a reliable printer or get around to painting up a suitable flag on my own. Some day.

Okay, slight spoiler for those who know "Chosen Men" - that cannon rolled snake eyes while trying to thin the redcoat herd to the north.  This is too nice of a picture not to memorialize here.


Wednesday, April 7, 2021

2x2 Napoleonics : A Bit of Eye Candy

 More black powder gaming using a neat little trick for roads and streams...

Simple yarn.  It's just the right scale for 2mm figures, and you can nudge it all about to make just the right curves.  Placed down on a fleece battlemat and it works a treat.

Monday, March 8, 2021

In The Shadow of Giants

Banged out a quick weekend project recently, with mixed results.  These towering trees look okay, but the roots are nil, and they are way too fragile for regular use.
Classic construction method consisting of paper towel cardboard tubes covered with tissue, and the tissue is held in place with watered down craft glue. The problem is that even with the glue dried they're very lightweight they need a much heavier base probably a cap of something harder than just tissue paper over the top.

 I'll get some use out of them but it's hard to see how many games. Which is fine I don't have enough storage for these things anyway.

Friday, February 26, 2021

Utility Terrain

Final shots of some utilitarian terrain.
The lumber here is coffee stirrers liberated from the local coffee shop eating on a bed of popsicle sticks and lies.


Friday, February 19, 2021

Modern Conflicts Call for Modern Solutions

Starting to amass a little ultra-modern warfare collection for use with Black Ops.  To date, I've only ever played that game using sci-fi figures, but for the first time in a long time, I'm starting to get a handle on how modern warfare can be wargamed.  More on that later.  For now, how about some terrain eye-candy?

All of these office trailers come from Game Craft Minis.  Resin pieces with only a trace of bubbling, and all of it down on the underbelly.  I added a couple of safety posters and a bulletin board using cereal packet to spruce them up a bit.  For sixteen American dollars you get three different 'sculpts' in each pack, a fine addition to any work site.  These will do double duty as makeshift housing for separatist compounds, but for painting, the construction look will do.  
To give them a bit more character, I put two of them up on concrete blocks cut from matte-board.  Thicker than cereal box cardboard, the matte-board paints up just fine as flat concrete slabs, the better to keep the trailer off the ground.  Just a little touch to make these pieces all mine.


Monday, December 28, 2020

Scattered Shots and Thoughts

 Time to make a scene!

Can't fight for the throne of the Trossian Empire if you don't have a continent of Tros to fight on.  So let's take a look at some of that scatter  This is all 2mm terrain from either Irregular Miniatures or PicoArmor.

Irregular trees on the right and, believe it
or not, hills on the left.
Very low hills.

Some water features, all from PicoArmor.
Not sure that I have a use for the coastal fortress or the light house, but the boat will make for a fine objective.  And even if they don't have a use, they add a touch of scenery.

Towns and such from Irregular
Now that I've got these painted, I can map out and paint up a few 'drop cloths'.  With the colors in pace and the river and widths established, we can move on to the next step.

PicoArmor churches, with a variety of extra steeples,
so you could make all these Orthodox if you want.
Figures for scale.
One thing to note on this, Irregular makes a much larger cathedral that includes the stone walkway you see in the center.  That cast wasn't very good, and it was way too big to fit into my storage, so the centerpiece didn't make the final cut.  I still used the stone base for a PicoArmor building, to...mixed results.  Looks great, but:


Now the church doesn't fit into my storage box.  The colored boxes are 4" by 6" photo storage boxes that fit neatly into a carrything case.  That courtyard makes the cathedral just a little too big.  So I snapped off the steeple and now when I want to use there is some assebly required.  Gotta roll with those punches.

Saturday, December 26, 2020

A Big 2mm Update

The big hoopty for 2020 here at Chez Inabox has been the move to integrate 2mm scale gaming into the mix.  Not only that, but we determined that a move into the new frontier of mass battle black powder gaming was in order.  We like to zig when the world zags, and we rarely go in half-way.  Five full armies and a few scattered allies await five players.


The littlest Brunswickers

But all those piles of teeny-tiny soldiers need some ground to battle over, and now we've just about got it.  Here's a shot of some excellent Irregular and PicoArmor terrain for you, primed and ready for some color.


Just getting the vegetation done adds a lot to the visual appeal, n'est pas?
And to give you a better idea how tall the little hills are, here is a WIP unit of Imperial or Militia infantry ready to storm the slopes.

One of the decision points on a project like this comes when you have to decide exactly how to account for the base thickness.  The massive 25+mm figs tower enough that it doesn't really factor in at all.  When your boys are only as tall as the base itself, it forces a wargamer to think.  Should the terrain have a base just as thick as the units?  I've decided to do just that.  It makes the table look a little more 'gamey' and a little less 'living diorama', but the game comes first.  This will help establish that border between 'open ground' and 'special circumstance' and prevent it from looking like all the armies are hovering well above the rest of the terrain demarcations.

And Happy Boxing Day, ya crazy, lovable, all-too-friendly Great White Northerners.


Saturday, October 10, 2020

On the Table at 2mm

With the painting out of the way, let's take a look at what 2mm figures look like on the table.

But first, here is a side-by-side shot of the Great Traffic Light Alliance, with British on top and Austrian in the middle and Russians on the bottom row.

Any serious wargamer would chafe at the oddities of these line infantry.  Any wise wargamer would understand that the pieces are representative - we're going to be using these guys for everything from the Marlborough Ear to Seven Years War and maybe even a little Napoleonics.  That's a pretty wide swath of history that saw a lot of refinements in battle field tactics.

My armies are hampered a little by the decision to purchase army packs that work great for one specific era.  Using them for a broader than intended sweep means sacrificing purity for flexibility, a sacrifice that I am willing to make for the cause of good gaming.

And here is a good shot of how easy it becomes to recognize friend from foe on the table.  Ignore the massively out of scale roads.  (It makes me smile to think of 6mm terrain as way too big.)  Instead, note that the Austrians and Russians are easy to tell apart.  So too with the difference between cavalry and line infantry, with even a little cannon holding the giant crossroads easily distinguished by its unique appearance.

While I'm not yet a 2mm supremacist, this project has been very fulfilling.  It's a new scale for me, and the game scale - full Corps represented by around 20 elements - offers new challenges and a fresh approach to big battles over that of the usual "Rank and Flank" style games.

Don't be intimidated by their size - these guys are great.  

All my figures to date are from Irregular Miniatures.  They don't have a massive line of figures, but it's the biggest around (heh) and at this scale figures are extremely flexible.  It wouldn't be much of a stretch to choose some fantastic colors and name the blocks shown above as orcs or elves!


Saturday, August 15, 2020

City Planning

You can't take to the streets when you don't have any streets to which to take.  Before we can play the most cutting-edge and modern of wargames, Riot: From Watt Tyler to Watts we have to build a city worth peacefully burning to the ground.  Here's my quick and dirty and oh-so-effective way of whipping up a modular city perfect for modern, organically grown love-ins and the dastardly forces of peace and prosperity who oppose them.  Or vice-versa.


Masonite boards, cut to fit the transport box, painted black.  Layer up the curbs with matte board painted gray, then cut 1/2-inch thick lumber in a variety of sizes. A gray primer makes for a fine base coat.  Don't worry about the gray-on-gray.  It won't last long.

Note that I'll leave the tops gray - I've cut the z-axis of the board off at one story because the additional levels of the city won't factor into the game.  Not at the scale of conflict that we are modelling here.  This also allows for better access to the inner streets.  Maybe not suitable for mecha fights or big stompy monsters, but it works for what we're doing here.

Even just a quick painting of the walls of this city adds some variety to the proceedings.  You could almost play the game right now, but we're all about the visual appeal here, so we have a lot of work to do yet.  The buildings are dry fit for now - they need to have the walls fully painted and detailed, and some steps and curbs added, before the final fixation.


With a few blocks painted, and a bit of curbing in place, this city is already starting to feel safe enough to attack.  For my part, I eschew real-world politics and real world companies, preferring a more light-hearted touch.

 For example, in my city the big grocery chain is the Saferway.  Just like the original, only safer!  The building in the background was supposed to be a police station, but it didn't turn out as obvious as I'd hoped.  I need to figure out a few little details to add to really sell the idea.
 And Saint Drogo was the Patron saint of ugly people.  Seems fitting given the patchouli-scented losers who will be targetting this place with molotoc cocktails.
 You know, the sort of people who think nothing of spray-painting graffitti onto any flat surface that goes unwatched for ten minutes? 
This little convenience store still needs some gas pumps out front.  But I'm pretty pleased with the booze-shop across the way.  Licker's Liquors, serving Raccoon City the finest in alcoholic beverages since 1964.


Friday, August 7, 2020

Riot: A Game Twenty Five Years in the Waiting

One of the projects that has been on my 'to-do' list for over twenty-five years is a good old-fashioned, downtown riot.  Something about the asymmetric nature of the conflict, the confined corridors of battle, and the fluid nature of the fight just screams for a proper wargame.

Maybe it's the Pac-Man fan in me.

Whatever the reason, something in the air inspired me to finally quit with the wishing and get with the making.  About forty bucks and a Saturday afternoon later saw the early stages of a nice waffle-iron downtown set-up that fits into a neat little package.  

Irregular Miniatures sells a set of figures for about forty-five bucks, and a set of rules for five bucks.  The rules are twenty-five years old, and are very tongue-in-cheek, with scenarios suitable for Olde English tax protests, Napoleonic riots, Central American crackdowns, and modern American urban insurgencies.  Called Riot: From Watt Tyler to Watts, I gotta admit to needing a quick lookup to understand the first reference.  From the Infogalactic Entry:
Walter "WatTyler was a leader of the 1381 Peasants' Revolt in England. He marched a group of protesters from Canterbury to the capital to oppose the institution of a poll tax. While the brief rebellion enjoyed early success, Tyler was killed by officers loyal to King Richard II during negotiations at Smithfield, London.
For the record, the other battle-packs available at Irregular Miniatures website are a lot cheaper, and they are built to provide just about everything you need to play one of the scenarios included in the Riot rules.  So if you want a cheaper entry, get the Poll Tax Rebels or the Revenge packs.  The Revenge one in particular contains a fun surprise, as does the scenario for which they serve.

Some advice for those whose interest I have piqued:  The rules call for square bases 25mm in size for everything, and roads of either 25mm, 50mm, or 75mm width.  The rules assume an invisible 25mm grid for the play area - invisible for the purposes of aesthetics - and call for movement only in the four cardinal directions.  No diagonals!

By building my city before cracking open the rules, I've already shanked my chances for playing RAW.  My roads are too wide, and it's not yet clear how that will affect game play.  It'll take some wiggling and house-ruling to figure out how to move mobs in a way that keeps within the spirit of the rules.  And in a way that diagonals won't wreck things, because...come on.  It's miniature wargaming, grids are for RPGs!  I might also forgo the square bases in favor of cheaper and more readily available washers.  I'm allowed to do that.

As usual, and as a wargamer with a limited capacity to remember things, I've thrown together a quick reference sheet (pic related).  You know, just in case anyone out there wants to give these somewhat obscure rules a shot.  It's not enough to play the game - you'll need point costs for forces, scenarios, and a lot of rules buried in the text before you can play - but if you've got 'em, you'll find this sheet very helpful during play.

Congratulations.  This post just about provides more information about this game than any other website out there.  You're almost an expert.


Wednesday, April 29, 2020

Fifteen Odds and Sods

Just a couple of quick and dirty terrain pieces completed over the weekend.  The jersey jersey barriers and skull mountian are from Rebel Minis.


The skull painted up nice.  The barriers have a printed plastic feel with a striated look the takes some sanding to get a decent look.  The pieces are really light and don't take plastic well, even with a base coat of primer.  Can't recommend them.


These two wetland/marsh/boggy ground fill a much needed gap in my terrain of "blocks movement but jot LOS".  It doesn't take that much more effort to build two rather than one, so now each of my boxes (fantasy and sci-fi) get one.


Wednesday, March 30, 2016

Another War In A Box

Inspirational!  From poster Teardrop World over at the Lead Adventure Forums, check out this fun approach to a war in a box:

This is just a peek - check out the full thread (link) for a lot more pictures with a lot more detail.

Thursday, March 10, 2016

In the Pits

One of the nice aspects of the half-a-level pieces shown in the last post is that it gives you a chance to incorporate even more three-dimensional challenges.  Flat painted with deep pits shown in perspective are nice - need to do some of those some day - but nothing beats the visual appeal of a sunken and flooded room like this.

Bonus points to anyone who recognizes the inspiration for this room.

The water level of this room is the bottom layer of the foam core paper.  Spray, painting the entire terrain piece resulted in significant warping of this paper.  This was not unexpected - part of the reason for the island in the middle is to maintain some integrity in the room, and I was careful to weight down the piece with a heavy textbook while it dried to ensure that the outer edge of the room would lay flat during use.  The remaining warping in the water level looks a bit like waves and is obscured by the paint job.  A terrain piece with a hard floor - either wooden or stone - would need to be heavily reinforced prior to painting.

Tuesday, March 8, 2016

Half A Level Onwards

In the grand old D&D tradition, going down a level in Castle Meatgrinder means going up a quantum step in difficulty.  You won't find black dragons or pit demons on level II.    One of the few sops to metagaming tolerated at my table is that understanding that you shouldn't go down too far past your limitations.  To help the players, when characters do advance down a level, the players will know it due to the long length of the staircase, pit, or chute.

That said, elevation differences are one of the best ways to add variety to encounters, and beef up weak opponents by giving them the literal high ground.  In a 3D environment such as Castle Meatgrinder this is often accomplished through the use of daises, platforms, and the odd wall crawling beasty.

This small collection of half-level rooms open up the possibility of fighting in cramped quarters on staircases that don't equate to the full change in difficulty level typically encountered.  There isn't much room in the One Box to Hold Them All, and these rooms take twice the space of the rest of the rooms.  As a result, these rooms are just a dead-end offshoot of the main level.  It may be possible to use one of my straight staircases to provide a second way to access the larger room shown here.  Have to experiment a bit with that.

You could double up on the standard 5-mm foamcore to make rooms like this, but I had some thick foam sheet left over from a previous project, so this was a case of making use of what was on hand.  Otherwise, the construction details and paint scheme are the same as the rest of the dungeon.

An extra little piece of three by three foamcore called out for something different, so it got turned into a curved flight of stairs.  That gives this set-up two different ways to access the upper half-a-level.

Tuesday, February 9, 2016

New Yan'qui Craftsman


The dungeon just got in a big shipment from Fantasy Ikea.  Frankly, I'm doing everything I can to avoid building doors.  Still haven't found a technique that I like yet.

Sci-fi figure for scale.
Everything you see here was made with popsicle sticks and hot glue.
Click to see better detail on that table.
Well, not quite everything.  The bottles are cut off bits from a bunch of G.I. Joe knockoff action figures that have been rattling around the bits box for years.  The scrolls are cut off bits from wooden dowels.  Other than that, it's all coffee stirrers and popsicle sticks.

Some of this stuff is a bit over-sized and clunky, but dungeons are strange places.  Things should look just a little off.
Two beds, still need mattresses and pillows.  Need those wandering
monsters well rested before their big entrance.


Wednesday, February 3, 2016

Dungeon Construction - Paint on the Walls

Watching Guy Ritchie's The Man From U.N.C.L.E. was a fun, if trying*, way to pass time while slapping paint around on the tiles for Castle Meatgrinder.  The tiles were spraypainted earlier in the day, with some trepidation.  

*Fun spy flick, but a mistake to put on a movie with that many subtitles in it while you try to paint something.

Worried for nothing.  The craft store sells a nice foam-safe spray paint in a dark gray.  After spraying these boards, you can dust them with a black and light gray for an easy mottling effect.  The boards were ready for use, at that point, but I slapped down some brown and gray on the floors, too, to add even more texture.

Monday, February 1, 2016

Dungeoneering Tiles, Take Two

When last we met, I file-thirteened a pile of half-finished terrain consisting of a bunch of shoddy dungeon work.  This time out, I built a dungeon using my preferred materials, foamcore and balsa wood.  This time around, I used foamcore for the bases and balsa wood for the 'walls'.  The balsa is straight and very easy to work with.  So easy, that I ran out of it quick and had to halt work for a few days while I ran out and picked up more of it.  The photos below show just a few of the three-inch square tiles constructed to date.  I also have a small number of six- and nine-inch rooms to add to the mix as well.

Now, I'm not sure that this is going to work out well.  Everyone tells me that foamcore warps like the devil when you paint it, but that's never been an issue for me before, so we're going to give it the old college try. If it doesn't work...no problem, that just means I get start over, and that means I get to build more stuff.  It's my own little Xanatos gambit.

Like the tiles, my second round of doors turned out better, too.  This version was constructed entirely out of popsicle sticks, which give it a lot more rigidity.  The base is still too light, though, so every time you open the door, the whole thing tips over just a teeny bit (one of the virtues of working in 15mm scale) and the door winds up acting as a kickstand.  It's not too egregious, though, so we'll live with it.


As you can see, they are still a little too big, but that adds to the alien-terrain feeling.  And hey, ogres, giants, and dragons gotta squeeze through those things, too, you know!

The next step, painting, will be make-or-break it.  I plan to base these things in dark gray spray paint, and even though I've got something designed for use with styrofoam, you never know until you pull the trigger.  If the painting goes well, we've got a new dungeon tile system.  Better yet, and I have some thoughts on how to make this system even more flexible in ways that I haven't seen done before.  Stay tuned.

* * *

Last month was my best month ever for hits on this blog.  Thank you all for stopping by the old Abox residence.  You folks are the best motivation evar!