Showing posts with label 10mm dungeon. Show all posts

Monday, May 14, 2012

De Nile Ain't Just a River in Egypt...

...it's also a river in Sudan.  Just sayin'.
FU12 - Mummies

FEY3 - Pharoah's Undead Tomb Guards
DN20 - Treasure Pile
This post wraps up the undead portion of our show.  Stay tuned for the big brutes, coming soon; rock monsters, ogres, and trolls, I'll spare you the 'oh my'.

Thursday, May 10, 2012

It's a Trap Marker

One of these days you'll see how we use these figures in the game.  For the most part, you can fit a couple of rooms of dungeon hastily scrawled on a letter sized piece of paper.  That means drawing furnishings right on the page, but once in a while it's nice to give the players something 3D to look at, and to let them know that something is up. These remains figures work great for giving the players a clue to the presence of a trap. Throw one of these down in the middle of an unremarkable room and they may rush to loot it once, but the second time they see these, they'll know to tread with caution.


The dragon skeleton will most likely be a red herring - something to give the players pause, but not something that will have any direct effect on them.  That giant snake, though, that'll effect them good and hard.  The red black and gold coloring is that of a coral snake, one of the deadliest in the world, but the pattern of colors is all fantasy.  Biologists and herpetologists may roll their eyes at the pattern and scoff at the idea of coral snakes in the desert, but not using the bog standard green-with-maybe-some-yellow-highlights coloring helps this snake stand out.


Sunday, May 6, 2012

Lady's First, First Lady

Finally added a female to the collection.  This is Pendraken's hero, Kiera.  My daughter has been ready to jump into the game, but wanted to wait until she had a female figure to call her own.  This is it - Annie, the elven friend to the wolves and slayer of spiderscleric of Saint Orandis, Patron Saint of Animals (after a last minute substitution).


The two sewer entrances from Pendraken's dungeon pack had been languishing in my bits box.  I don't do the third dimension so much, but wanted to use them.  Instead of putting them upright, I glued them to a washer and voila!  Instant mysterious pool of glowing green goo.

Wednesday, May 2, 2012

Loot!

No, literally, today I've got some loot to show you, complete with arcane spellbooks, bags of gems, and magic swords:
That oughta be enough to lure some dumb adventurer to his death.

And a Pendraken skeletal champion (FU26 - Hero).  You can tell this guy is a hero because he has a full, luscious head of hair.

Also, flaming red eyes.
I've got a whole lot of undead on the workbench right now.  The skeletons don't really paint any faster than the rest of the figures, despite the fact that my white base coat means that I don't have to paint the bulk of the figure.  You have to do a second drybrush of white after the brown wash to bring out the details.
His shoulder insignia matches that on the shields
of the rest of the skellies.  You'll see them tomorrow.

Wednesday, April 4, 2012

Dungeon Glamershots

Now that we're elbow deep int the 10mm dungeon project, I thought it might be nice to step back and take a look at the table in all it's glory.  These are composed glamer shots in the true meaning of the word glamer - this is the illusion of a game.

Technically this isn't a table shot - it's an oventop shot.
That's where the best lighting in the house is - even get some nice indirect
back lighting off the control panel.

Our heroes listen for trouble on the other side of a heavy door.

Orc ambush!


The guardsorcs step from their alcoves.

Sir Bigsword charges ahead while El Wizardo deals with a flanking maneuver.

Moving quickly to stop the eldritch ritual.

A view from the bully('s) pulpit.
As always, click on the pictures for a bigger image.

Tuesday, April 3, 2012

Break on Through

Don't you just hate it when you and your bro-orcs are just hangin' out chillin' when some band of armed thugs just leaps into your pad and starts trashing the place without so much as a how-do-you do?  Well I'm here today to make you an incredible offer on a product so fine it's guaranteed to provide you the sort of well earned privacy that every bad thinking monster deserves.  It's the latest technology, brought to you straight from the minds that brought you arrow slits, and it's called 'doors'.


Just look at that poor bastard, locked out and only able to dream of the loot he could be stealing from your smoldering corpse.

And they come in a wide variety of shapes and sizes.  No matter your needs, when it comes to locking out those smelly thieving hobbitses, think smart - think doors.

Sunday, April 1, 2012

Sprucing Up the Old Dungeon

The thing about dungeon furniture is that every piece you put down reduces the playing space by one space. So what you're really after is the suggestion of furnishings; at the table your imagination takes over and fills in all the gaps. At least that's my story for why I don't make a lot more furniture. Although these pieces were so much fun...I probably will make a lot more.

A chest, a well, an altar, and two sarcophagi.  Wizard for scale.

Close up of the 'face chest' (left), the 'lid don't fit' chest (right),
and the evil altar - see the glowing green runes on it?

Two stone sarcophagi and a well.  Those'll make for some good
feng shui for the monsters.
That well was a bit of a trick to make.  The stones are two cardstock pieces cut out into a donut shape the same size as the washer.  Then I cut each one into six pieces, tossed one out, and glued the remaining five to the washer.  That way the stones are curved and almost fit together, but not quite.  So it looks like the sort of thing a fool of a Took might chuck a stone down.

Speaking of fool of a Took, happy April Fool's Day.

Sunday, March 18, 2012

Tomb of the Tiny Pharoah

With those new 10mm figures arriving from over Pond, the continent, and then halfway across another pond, I've had plenty of time to get a jump start on the dungeons.  Here's the second (or third if you count the wilderness area), in all it's complete glory.  This time around, we're going fully 3D.
As always, the tiles can be rearranged to make a lot of different floor plans.
The red tiles are elevated by a full 10mm, and the only access to them is the steps flanking the altar at the far side of the room.  The baddies can plug up the steps and rain arrows down on the heroes.  Those two movable columns can serve as cover.  There's something a bit off about this dungeon - one detail needs to be added, but I can't quite put my finger on it.
The !Egytian temple room.
The four columns are made of small wooden spools bought for 15 cents at the local craft store.  Card stock squares cut to the size of the tiles hides the spool holes.  Click on the images for a closer look at the hieroglyphics along the top of the columns.  They run the length of the interior walls of the back room as well.  Those were printed up, cut to size, and glued in place before the protective dull coat.  Nothing too fancy.
Four columns should do it - every column shrinks the dungeon
by one square, so you don't want too many.
I haven't even ordered the figures for this dungeon yet, but it made for a good project to tide me over until the first figures arrive.  Which they did.  I show you what they look like tomorrow.

Wednesday, March 14, 2012

Lair of the Rat King

Construction ended on the sewers beneath Cornerstone Keep.  The last step is a thick spray of dull coat to protect the work.  Otherwise, these tiles are ready for the minions of the Rat King and the adventurers to slay them.  As promised, I'll spare you the details on the sewage and dirt; suffice it to say, I started dark and brushed my way lighter until it hit the desired shade.

The maze in one of its many permutations.

Close-up of some of the detail.

Movable bridges.
Those little bridges are made out of bamboo kabob skewers.  Cut to 15mm lengths and superglued together, they look just like rough logs at this scale.  They even work well with the outdoor tiles that are in progress, too.

I'm really looking forward to getting  those figures in the mail.  I feel like Ralphie waiting for his Little Orphan Annie decoder ring, only better - I know my figures aren't just an advertisement.

Tuesday, March 13, 2012

Ideal Idylls of the Idle Rat King

Work progresses on the sewers.  Black spray paint, white drybrush on the tiles, and one tile grayed up a bit.  The color gradations on this terrain are subtle; they are the details that you only don't notice when they aren't there.  Here's a comparison of the white (left) with gray applied (right):


With all of the stone tiles completely painted, the terrain looks like this:

 These are sewers, to there's even a bit of green, just the faintest hint of green, drybrushed onto the tiles.  Click on these for a close-up.  Here's a single tile so that you can see a bit better.


Next step is to paint in the sewage and the dirt into which the sewers were dug.  Actually, that's already done, but I'm going to wait one more day to show them to you.  Don't worry - I'll spare you the tedious details on painting the sewage and the dirt - tomorrow will be the finished product.

For ease of navigation, there's a tag cloud over to the right.  Have fun with the added functionality, kids.  Also, don't do drugs.

Saturday, March 10, 2012

First Three Sewer Tiles

Enough of the playing coy with the goods.  Here's the very first terrain board.  If you look close, you can spot the two examples of textures that I used in the last blog post.  You're looking down the long axis of a corridor three squares wide with a sewage channel running down the center.  

That channel present a nice obstacle for the heroic little mans.  One way to keep each dungeon distinct is to present unique challenges and give the players some reason to think tactically.  That channel forces them to pick a side or maybe split their forces.  At one square, they may be able to jump across it, but failure means bigger trouble than ever.

From start to finish, the construction of this tile required about an hour of effort.  I've since completed two more tiles, and they took about the same amount of time.  One hour for a long and elaborate hallway plus three rooms isn't that bad of a pace.

Today's lovely parting shots are of all three terrain tiles laid out in just two of the possible combinations.  As always, click on the picture for a bigger view.


These are going to look so sharp I'm tempted to start painting right now, but that would be a mistake.  I need to build one more tile to have enough space for all of those filthy minions of the Rat King.

Friday, March 9, 2012

Sewers of Cornerstone Keep

With the construction plan in place, or at least as in place as its going to get until it meets first contact with the enemy, we can now set about building the first dungeon tiles.  I'll spare you the details on the campaign background for now - it's enough to say that we are building a sewer system that will be populated by the contents of Pendraken's Rat King's Lair Dungeon Pack.

Before we get into that, though, one of the things to point out is the necessity for layers in a project like this.  Here's a great example of using the 2mm matte board for the basic tiles and cereal box cardboard for thinner tiles to add texture to a tile:

Those cardboard steps don't amount to a full fledged change in elevation, but the little drop adds a bit of depth and hence visual appeal to the board.


Here's another example of layers for texture.  I cut a 'hole' in four of the 2mm tiles and capped it with a washer cut from cereal box cardboard.  Before putting the ring in place, I glued a couple of cross cut pieces of spaghetti for grating.  There are four 'layers' here (base, bars, floor, and ring) to break up the monotony of the flooring.

These little details will give me more surfaces and edges to highlight and really make the hallways of this terrain jump out.  Next time we'll look at three of the tiles post-contruction and pre-painting.

Thursday, March 8, 2012

The Halfway Solution

So if 8" geomorph tiles aren't going to work, what is? That is the question.

After a day of mulling it over and several hours of research (read: trawling the internet), it occurred to me that making flat terrain tiles for 10-mm figures is a fairly low cost and non-time-intensive strategy. There's no reason not to make each dungeon unique. You really only need four tiles for each dungeon, and with a bit of thought, you can make the tiles for different dungeons fit together for one massive megadungeon.

Yesterday, I picked up a handful of 8-inch by 10-inch pieces of 2mm thick matte board. This is the stuff that the craft shop charges an arm and a leg for when you use it to make attractive borders for wall art. They always wind up with a stack of standard sized rectangles that they'll let you have for a buck.

Each sheet is the right size to give you a 13x13 grid of 15mm squares, plus enough left over to cut 29 tiles.  Here's a shot of the plan for one board, with a washer that will serve as a base for the little mans for scale.  It's a bit light, as I didn't want to press too hard lest the unused portions of the board end up with a grid, too.

The tiles are light gray and not this awful green.
Not quite sure what happend to the colors there.
Here is a small stack of the tiles carved out of the remaining scrap board.

The 2mm thickness for the tiles amounts to about a foot and a half in little man scale.  That's pretty good for stairs if we want to go 3D (we do), or even if we just want to add textures and layers to a single level dungeon (oh yeah we do).  More on that next time.

Wednesday, March 7, 2012

Dungeon Mapping

Let's think about this for a minute. Dungeon design for miniature use presents some unique challenges. You have to balance the feel of discovery of the unknown with replayability. At one end of the spectrum you have board games with a set single dungeon (like Dungeon) where the only random element is the monster and treasure selection. One the other end you have the room and hall approach favored by most commercial 3D dungeon products like Dwarven Forge.

It would be nice to build a new custom dungeon for every new hole in the ground that my players point their murderous avatars towards, but that's a lot of work. One and done just doesn't cut it for miniature wargaming. The downside of the room and hall approach is the sheer fiddly-ness (fiddle-osity?) of keeping everything together. Those rooms and halls tend to drift apart on the table every time you bump into it.

But there may be another way. What if you used the idea of dungeon geomorphs? These are tiles that always fit together, no matter how you slice them. You can pack rooms and halls together on the same tile and limit the amount of nudging it takes to keep the whole thing together.

So you start with these 8 tiles:


And you can make an awful lot of different dungeons, like so:

Now that I've seen it, though, that dungeon maze just looks too damn busy for my tastes.

[Update: Oh, and the other thing that occurs to me looking at this post, that arrangement of geomorphs gives you an unlimited number of dungeon layouts that all look like the same random collection of rooms and halls. Yuck. The more I look at this, the smarter it looks building a mockup before charging down that dead-end.]

There must be a better way...

Tuesday, March 6, 2012

New Project: Back to the Roots

With the latest car wars debacle still fresh in mind, it’s time to completely jump genres and scales.  It’s time to get back to my dungeon crawling roots. It’s been a few years since I’ve hosted a dungeon crawl, and this is as good a time as any.  Some thoughts on planning:
What rules?
This ranks as the most important question and the least important question at the same time.  On the one hand, the rules drive the miniatures.  On the other hand, there are a lot of rules out there, and they all operate from the same basic perspective with respect to the physical aspect of the game.  Every rule set worth its salt uses a square grid, so until we’re ready to really start rolling dice…we don’t need to answer this question just yet.  We will later, but not today.

A selection of Pendraken hero types in 10mm. 

What scale?
The big 25mm to 28mm miniatures are widely available and in a huge variety of styles, but they are so darn big.  You can only fit a few hundred in the box that I’ve got, and that’s assuming flat terrain tiles.  Which are boring.  They are also really expensive, on the order of $3 to $10 each, and they take an hour or more to paint.  Each.  Without the time, space, or money these are flat out wrong for me.

There are a lot of nice figures out there in the 15mm range, but most of those are sold in lots of 40-50 figures, the better to build an army.  You get a lot of personality, but wind up with a lot of unused lead in the bargain.  So that’s out, too.
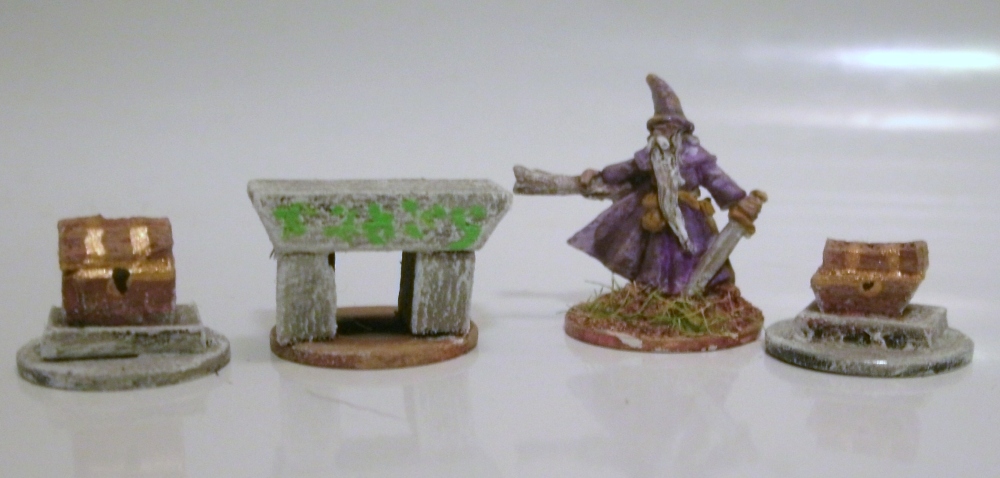
Considering the three critical variables, there is really only one scale that will work for my dungeon crafting purposes, and that’s the not-quite-too-small-10mm range.  They are cheap – less than fifty cents a figure, and you can buy them in small enough lots for dungeon delving.  As if that’s not enough, Pendraken make a line of dungeon furniture in 10mm, too.  And if you don't think figures at this scale have enough personality, you haven't seen what Copplestone Castings can do:
Copplestone Casting's brilliant hero pack in 10mm.
What figs?
Here’s a question to which there is no final answer.  I can tell you this, though: I was able to pick up almost 20 heroes,  30 orcs, 16 ratmen, 3 bases of rats, a couple of food tables, a sewer beast, fire, pack animals, and a crate of food for less than 25 bucks.  That’s not a bad start.  For the record, I ordered one pack of heros and one pack of bad guys from each of Copplestone Castings and Pendraken Miniatures.  They'll be shipped out from the UK which gives me plenty of time to get started on a dungeon for them to guard and loot.
What dungeon?
That's the fun of this whole project.  I'm looking at all the various and sundry ways of building a 10mm dungeon from print your own to pre-cast walls and floors, and none of them look like as much fun as scratchbuilding my own.  At this point I'm still browsing the craft stores and kitchen drawers to see what looks cheap and effective.  At any rate, that's what you can expect from this blog over the next few months.